How to Secure WordPress Login Page (Step-by-Step Guide)
Your WordPress login page is the front door to your entire website – and hackers know exactly where it is. By default, every WordPress site uses the same login URL: yoursite.com/wp-login.php. That makes it an easy target for automated bots running brute force attacks around the clock.
If you want to secure your WordPress login, you do not need to be a developer. This guide walks you through practical, proven methods – from limiting login attempts to enabling two-factor authentication – that you can implement today, even as a beginner.
Let’s get started.
Table of Contents
Why Your WordPress Login Page Is a Target
WordPress powers over 40% of all websites on the internet. That popularity comes with a downside: it is also the most attacked CMS on the planet.
Bots scan the web constantly, looking for the default wp-login.php URL. Once they find it, they try thousands of username and password combinations per minute. This is called a brute force attack, and if your login page is unprotected, it is only a matter of time.
A successful attack can lead to:
- Full admin access being stolen
- Malware injected into your site files
- Your website being blacklisted by Google
- Loss of customer data and trust
The good news? Securing your login page is not complicated. It just requires a few smart steps.
Pro Tip: Security starts at the foundation. If your hosting is unreliable or outdated, even the best plugins cannot fully protect you. Consider switching to a trusted host like Hostinger, which includes built-in malware scanning, automatic backups, and a robust firewall at the server level.
1. Change the Default WordPress Login URL
The single most effective thing you can do right away is change your wp-login.php URL to something bots do not expect.
When a bot cannot find your login page, it simply moves on. This alone can eliminate the majority of automated attacks.
How to Do It
Use a plugin like WPS Hide Login (free, available in the WordPress plugin repository):
- Go to Plugins > Add New in your dashboard
- Search for “WPS Hide Login”
- Install and activate it
- Go to Settings > General and scroll to the bottom
- Set a custom login URL (e.g., yoursite.com/my-secret-door)
- Save changes
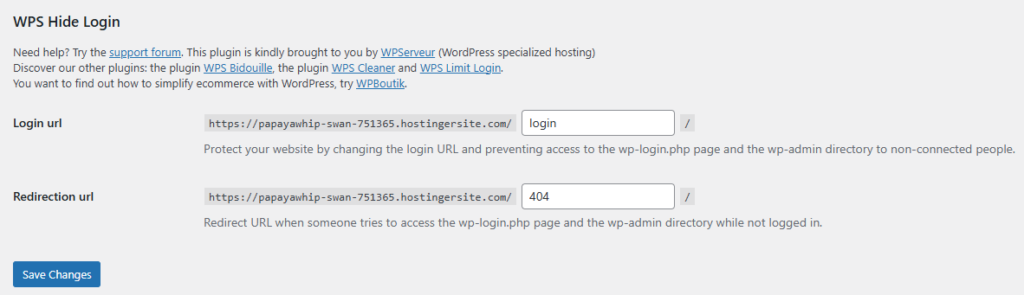
Important: Write down your new login URL immediately and save it somewhere safe. If you forget it, you may lock yourself out.
2. Limit Login Attempts
Even if someone finds your login page, you can stop brute force attacks by limiting how many times they can try to log in.
By default, WordPress allows unlimited login attempts. That is a serious security gap.
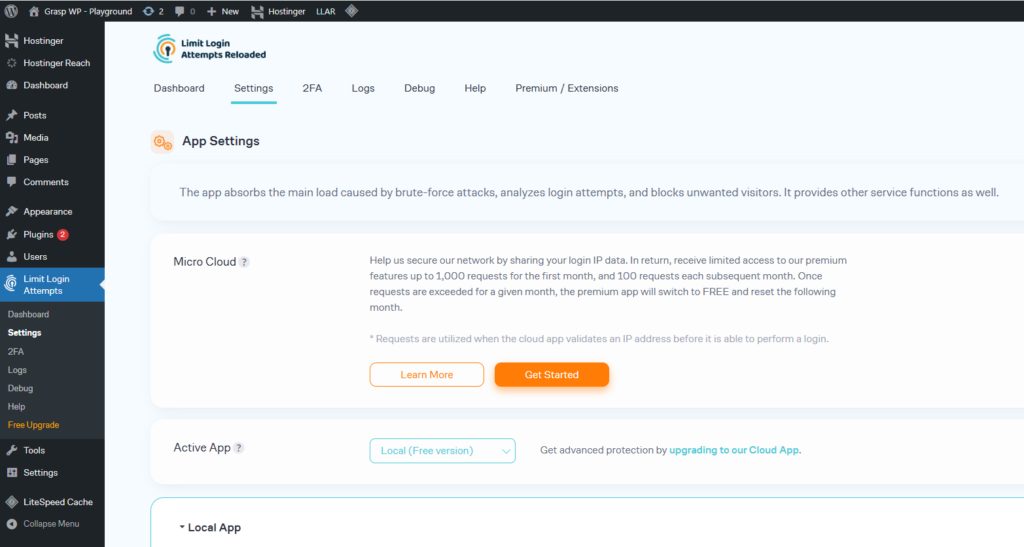
Recommended Plugin: Limit Login Attempts Reloaded
This is one of the most popular login security plugins with over 2 million active installs.
How to set it up:
- Install and activate Limit Login Attempts from the plugin directory
- Go to Settings > Limit Login Attempts
- Set allowed retries to 3 or 4
- Set lockout duration to 20-30 minutes
- Set longer lockout after multiple lockouts (e.g., 24 hours after 4 lockouts)
This simple step makes brute force attacks impractical. A bot that can only try 3 times every 30 minutes will give up quickly.
3. Enable Two-Factor Authentication (2FA)
Two-factor authentication adds a second layer of protection. Even if someone gets your password, they cannot log in without also having access to your phone or email.
This is one of the most powerful things you can do to secure your WordPress login – and it takes under 5 minutes to set up.
Best 2FA Plugins for WordPress
- WP 2FA – beginner-friendly, free, works with Google Authenticator and email OTPs
- Wordfence Login Security – part of the Wordfence suite, reliable and well-supported
- Two Factor Authentication by miniOrange – supports multiple methods including backup codes
Setting Up WP 2FA (Recommended for Beginners)
- Install and activate WP 2FA from the plugin directory
- Follow the setup wizard – it is very clear and simple
- Choose your preferred method (authenticator app or email)
- Scan the QR code in Google Authenticator or Authy on your phone
- Enter the code to verify – done
Once enabled, every login will require both your password and a 6-digit code from your phone.
4. Protect wp-login.php with Password Protection
This method adds a second password prompt before the WordPress login form even loads. It uses your server’s built-in HTTP authentication.
Even if someone finds your login URL, they will hit this extra barrier first.
How to Add HTTP Authentication via cPanel
- Log in to your cPanel (your hosting control panel)
- Go to Directory Privacy (sometimes called “Password Protected Directories”)
- Navigate to your wp-login.php location or the root folder
- Enable password protection and set a username and password
- Save changes
Alternatively, you can do this manually via .htaccess, but the cPanel method is easier for beginners.
Note: If you are using Nginx instead of Apache, this method works differently. Ask your host for support or use a plugin-based approach instead.
5. Add CAPTCHA to the Login Page
CAPTCHA stops automated bots from submitting login forms because they cannot solve visual or behavioral challenges.
Adding a CAPTCHA to your WordPress login page – and your registration and comment forms – is a quick win.
Recommended Options
- Google reCAPTCHA v3 – invisible, no user action needed, works in the background
- hCaptcha for WordPress – a privacy-friendly alternative to Google’s reCAPTCHA
- Cloudflare Turnstile – newer, fast, and integrates well with WordPress via plugins
Most security plugins (like Wordfence or WP Cerber) include CAPTCHA options built in, so you may not need a separate plugin.
6. Use Strong Passwords and Change the Default Admin Username
This one sounds basic, but it is still one of the most overlooked issues.
Many WordPress sites are hacked not because of a missing plugin, but because the admin username is literally “admin” and the password is “password123.”
Username Best Practices
- Never use “admin” as your username – it is the first thing bots try
- Use a unique username that is not your email address or your name
- If you already have “admin” as a username, create a new admin user, log in with it, and delete the old one
Password Best Practices
- Use at least 16 characters
- Mix uppercase, lowercase, numbers, and symbols
- Use a password manager like Bitwarden or 1Password – do not try to memorize complex passwords
WordPress has a built-in strong password generator when you create or edit a user. Use it.
7. Block IP Addresses After Failed Logins
If the same IP keeps hammering your login page, you want to block it permanently – not just temporarily.
Most good WordPress brute force protection plugins handle this automatically. But you can also do it manually.
Via Wordfence
- Install Wordfence Security (free version is powerful)
- Go to Wordfence > Live Traffic
- You will see all login attempts in real time
- Click on a suspicious IP and select Block This IP
Wordfence also lets you set automatic IP blocking rules – for example, block any IP that fails login 5 times in 4 minutes.
8. Keep WordPress, Themes, and Plugins Updated
Outdated software is one of the top reasons WordPress sites get hacked. Security vulnerabilities are discovered regularly, and updates patch them.
This applies to:
- WordPress core – update it as soon as a new version is released
- Themes – even inactive ones can have exploitable code
- Plugins – especially ones that interact with your login or admin area
Go to Dashboard > Updates regularly and apply updates. You can also enable automatic updates for minor WordPress releases under Settings > General.
For more on keeping your site optimized and running well, check out our guide on how to speed up your WordPress website – a fast site is also a more maintainable site.
9. Use a Security Plugin for Complete Login Protection
If you want one plugin that handles multiple layers of login security at once, these are the top choices:
Top Login Security Plugins
Wordfence Security
- Real-time threat intelligence
- Login attempt limiting
- IP blocking
- 2FA (in premium)
- Free version is very capable
WP Cerber Security
- Excellent brute force protection
- Login URL change
- CAPTCHA integration
- Traffic inspection
- Stronger hardening options than some competitors
Solid Security (formerly iThemes Security)
- User-friendly interface
- Login security dashboard
- Password expiration policies
- Good for beginners
Pro Tip: Do not install multiple heavy security plugins at once. They can conflict with each other and slow down your site. Pick one main security plugin and complement it with lightweight additions (like WP 2FA or WPS Hide Login).
For a full overview of keeping your site protected beyond just the login page, read our WordPress security guide.
10. Enable SSL (HTTPS) for Your Login Page
If your site is still running on HTTP, login credentials are transmitted in plain text. Anyone on the same network can intercept them.
SSL encrypts all data between the browser and your server, including usernames and passwords.
How to Get SSL
- Most quality hosts provide free SSL via Let’s Encrypt – Hostinger includes it with all plans
- In cPanel, look for SSL/TLS or Let’s Encrypt
- Once installed, force HTTPS by adding this to your wp-config.php:
define('FORCE_SSL_ADMIN', true);This forces the login page and admin area to always use HTTPS, even if someone tries to access it over HTTP.
Common Mistakes to Avoid
Based on real experience managing WordPress sites, here are the mistakes that leave login pages vulnerable:
- Using the default admin username – bots target this first, always
- Skipping 2FA – a password alone is not enough anymore
- Ignoring plugin updates – old plugins with known CVEs are exploited constantly
- Not testing your login lockout – make sure your plugin is actually working
- Installing too many security plugins – this causes conflicts and slows down your site
- Forgetting to back up before making changes – always back up first
For help managing and avoiding other site issues, see our article on common WordPress errors and how to fix them.
Frequently Ask Questions (FAQ)
What is the most important step to secure my WordPress login page?
Changing the default wp-login.php URL and enabling two-factor authentication together provide the biggest security boost. Bots cannot attack a login page they cannot find, and 2FA stops anyone who does find it.
Is it safe to change the wp-login.php URL?
Yes, it is completely safe when done with a reliable plugin like WPS Hide Login. Just make sure you save your new login URL before logging out, or you could temporarily lock yourself out.
Do I need a paid plugin to protect wp-login.php?
No. The free versions of WPS Hide Login, Limit Login Attempts Reloaded, WP 2FA, and Wordfence are more than enough for most WordPress sites. Paid plans add extras but are not required for solid protection.
How does WordPress brute force protection work?
It tracks failed login attempts from each IP address. After a set number of failures, it temporarily or permanently blocks that IP from accessing the login page. This makes automated attacks impractical.
Will adding login security slow down my website?
Lightweight plugins like WPS Hide Login and Limit Login Attempts Reloaded have almost zero performance impact. Heavier security suites like Wordfence use slightly more resources, but the protection is worth it. You can also pair security with a caching plugin – see our list of the best caching plugins for WordPress.
Should I block all login attempts from certain countries?
If you run a local business and have no reason to receive visitors from specific regions, geo-blocking can reduce noise. Wordfence and WP Cerber both support this. However, it is not a substitute for proper login security – use it as an additional layer, not your main defense.
Conclusion
Securing your WordPress login page does not require technical expertise – it requires taking action on the right steps.
To recap what you should do:
- Change the default login URL with WPS Hide Login
- Limit login attempts to block brute force bots
- Enable two-factor authentication
- Add HTTP authentication to protect wp-login.php directly
- Use a CAPTCHA on your login form
- Update your username away from “admin” and use strong passwords
- Block repeat offenders by IP using Wordfence
- Keep everything updated – core, themes, and plugins
- Choose one solid security plugin and stick with it
- Make sure HTTPS is enabled on your site
Start with steps 1 and 3 – they take less than 10 minutes combined and immediately raise your security level significantly.
If you want to go deeper into hardening your entire WordPress site – not just the login page – read our full WordPress security guide. And if your current hosting does not make security easy, it might be time to consider a move to Hostinger, which includes server-level protection, free SSL, and daily backups built in.
Have a question or a tip that worked for you? Drop it in the comments below – I read every one.