
How to Add Google Analytics to WordPress (Step-by-Step)
If you have no idea who visits your website, where they come from, or which pages they read – you are essentially flying blind. Google Analytics fixes that. It gives you real, actionable data about your audience so you can make smarter decisions for your site.
In this guide, you will learn exactly how to add Google Analytics to WordPress – from creating your GA4 property to seeing live traffic data on your dashboard. No coding experience required.
Table of Contents
What Is Google Analytics 4 (GA4) and Why Does It Matter?
Google Analytics 4 (GA4) is the current and only supported version of Google Analytics. The older Universal Analytics (UA) was officially retired in 2023, so if you are setting up tracking for the first time, GA4 is what you need.
Here is why it matters for your WordPress site:
- Traffic sources – See whether visitors come from Google, social media, or direct links
- User behavior – Find out which pages people visit, how long they stay, and where they drop off
- Conversion tracking – Track form submissions, purchases, or any goal you define
- Audience demographics – Understand your visitors’ countries, devices, and interests
Whether you run a blog, a business site, or a WordPress blog you want to monetize, analytics data is non-negotiable.
What You Need Before Getting Started
Before you connect GA4 to WordPress, make sure you have the following ready:
- A live WordPress website (hosted, not WordPress.com free plan)
- A Google account (Gmail works perfectly)
- Admin access to your WordPress dashboard
- About 10 to 15 minutes of your time
Step 1 – Create a Google Analytics 4 Property
Before adding anything to WordPress, you need to set up your GA4 account and property.
1.1 Go to Google Analytics
Visit analytics.google.com and sign in with your Google account.
If this is your first time, click Start measuring. If you already have an Analytics account, click the gear icon (Admin) at the bottom left.
1.2 Create a New Account
On the Admin screen:
- Click + Create and select Account
- Enter an account name (example: “My WordPress Site”)
- Configure your data sharing settings and click Next
1.3 Set Up a GA4 Property
- Enter a Property name (example: “GraspWP Blog”)
- Choose your time zone and currency
- Click Next, then fill in your business details (industry, size)
- Click Create and accept the terms
1.4 Set Up a Data Stream
After creating the property, Google will ask you to set up a data stream.
- Select Web as your platform
- Enter your website URL and a stream name
- Click Create stream
You will now see your Measurement ID – it looks like G-XXXXXXXXXX. Copy it. You will need it in the next step.
Pro Tip: Keep the stream details page open in a separate tab while you set up WordPress. You will need to refer back to the Measurement ID.
Step 2 – Add Google Analytics to WordPress
There are three ways to add Google Analytics to WordPress. The best method for most beginners is using a dedicated plugin – it is fast, clean, and requires no coding.
Method 1 – Using a Plugin (Recommended for Beginners)
The easiest and most beginner-friendly way to complete your WordPress analytics setup is through a plugin. Two popular options are:
- Google Site Kit (by Google, official)
- GA Google Analytics (lightweight and simple)
We will walk through both.
Option A – Google Site Kit (Official Plugin by Google)
Site Kit is Google’s own WordPress plugin. It connects Analytics, Search Console, PageSpeed Insights, and more – all in one dashboard.
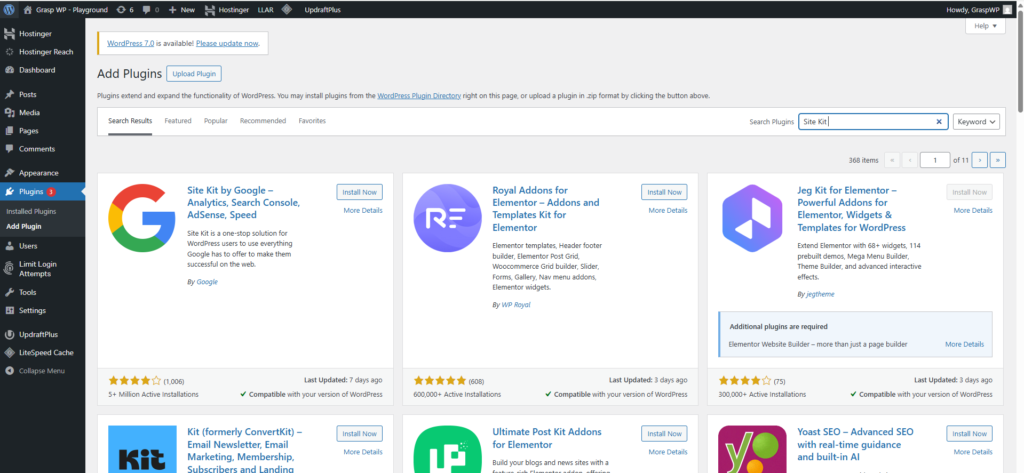
Step 1 – Install Site Kit
- In your WordPress dashboard, go to Plugins > Add New
- Search for “Site Kit by Google”
- Click Install Now, then Activate
Step 2 – Connect Your Google Account
- After activation, click Start Setup from the Site Kit menu in your sidebar
- Sign in with your Google account
- Grant the required permissions
Step 3 – Connect Google Analytics
- In Site Kit, go to Settings > Connect More Services
- Click Analytics and follow the prompts
- Select your GA4 property from the dropdown and click Configure Analytics
Site Kit will automatically insert the GA4 tracking code on every page of your site. No manual code editing needed.
Pro Tip: Site Kit also shows you basic analytics data directly inside your WordPress dashboard – great for a quick overview without opening Google Analytics every time.
Option B – GA Google Analytics Plugin (Lightweight Option)
If you prefer a simpler, lighter plugin that just handles tracking without all the extras, the GA Google Analytics plugin is a great pick.
- Go to Plugins > Add New and search for “GA Google Analytics”
- Install and activate the plugin by Jeff Starr
- Go to Settings > Google Analytics
- Paste your Measurement ID (the
G-XXXXXXXXXXcode) in the Tracking ID field - Set tracking method to GA4 / gtag.js
- Save changes
That is it. The plugin inserts your tracking code automatically on every page.
Method 2 – Add GA4 Code Manually (Advanced Users)
If you are comfortable editing theme files, you can paste the GA4 code directly into your theme. This method avoids adding a plugin but requires more care.
When to use this: If you are using a custom theme or want full control over when and how the script loads.
Step 1 – Get Your GA4 Script
In your GA4 property, go to Admin > Data Streams > [Your Stream] > View tag instructions. Copy the full <script> tag shown there.
Step 2 – Add It to Your Theme
Go to Appearance > Theme File Editor (or use a child theme’s functions.php).
Open your theme’s header.php file and paste the GA4 script just before the closing </head> tag.
Warning: Always use a child theme when editing theme files. If you edit the parent theme directly, your changes will be erased on the next theme update.
Method 3 – Using a Caching or Performance Plugin
Some popular plugins like WP Rocket or performance-focused setups allow you to inject header scripts directly without touching code. If you are already using one of the best caching plugins for WordPress, check if it includes a “header scripts” or “code injection” feature – many do.
This is a clean middle ground between the manual method and a dedicated analytics plugin.
Step 3 – Verify That Google Analytics Is Working
After setting up your WordPress analytics, you need to confirm that data is actually being recorded.
Check Real-Time Reports in GA4
- Open Google Analytics
- Select your property
- Click Reports > Real-time
- Open your WordPress website in a new tab and browse around
- Within 30 seconds, you should see yourself listed as an active user in the Real-time report
If nothing shows up after a few minutes, check these common issues:
- Your browser’s ad blocker may be blocking the tracking code – try an incognito window
- The Measurement ID may have been entered incorrectly
- The plugin may not be activated properly
Step 4 – Configure Basic GA4 Settings (Don’t Skip This)
Most beginners stop after installing the tracking code. But there are a few quick settings that will make your data far more useful.
Enable Enhanced Measurement
GA4 comes with Enhanced Measurement turned on by default for new streams. This automatically tracks:
- Scroll depth
- Outbound link clicks
- Video engagement
- File downloads
- Site search queries
Go to Admin > Data Streams > [Your Stream] and make sure the Enhanced Measurement toggle is ON.
Exclude Your Own Traffic
You do not want your own visits inflating your traffic numbers. The easiest way to handle this is to use a browser extension like Google Analytics Opt-Out or set up an internal traffic filter.
To set up a filter in GA4:
- Go to Admin > Data Filters
- Click Create Filter
- Choose Internal Traffic
- Add your IP address
- Set the filter state to Active
Link Google Search Console
Connecting Google Search Console to GA4 gives you keyword data – something GA4 alone does not show. This is one of the highest-value configurations you can do for a WordPress site.
In GA4, go to Admin > Search Console Links and follow the prompts to connect your verified Search Console property.
If you have not yet set up Search Console, that pairs perfectly with the right SEO plugin – both Rank Math and Yoast SEO help verify your site with Google automatically.
Common Mistakes to Avoid
Even experienced site owners make these errors when setting up Google Analytics on WordPress:
1. Using the old Universal Analytics tracking ID UA IDs start with UA- and no longer work. Always use your GA4 Measurement ID starting with G-.
2. Installing multiple analytics plugins at once Having both Site Kit and another analytics plugin active can result in double-counting your page views. Pick one method and stick to it.
3. Not filtering out your own traffic If you visit your site daily, those visits add up and distort your real traffic data. Set up the internal traffic filter early.
4. Skipping the verification step Installing the plugin does not guarantee tracking is working. Always check the Real-time report to confirm.
5. Ignoring the data for months Analytics is only useful if you actually check it. Set a reminder to review your top pages, traffic sources, and bounce rate at least once a month.
What to Track After Setup
Once your WordPress analytics setup is running, here is what to pay attention to first:
- Acquisition report – Where is your traffic coming from? (Google, social, direct)
- Engagement > Pages and Screens – Which blog posts or pages get the most visits?
- Real-time – What is happening on your site right now?
- Demographics – What countries and devices are your readers using?
These four reports alone will give you enough insight to make meaningful improvements to your content strategy and site structure.
If your site is slow and affecting engagement metrics, check out our guide on how to speed up your WordPress website – page speed has a direct impact on bounce rate and session duration.
Frequently Asked Questions (FAQ)
Is Google Analytics free to use with WordPress?
Yes, Google Analytics is completely free. GA4 has no cost for standard use. You only need a Google account and a live website to get started.
Do I need coding skills to add Google Analytics to WordPress?
No. Using a plugin like Site Kit or GA Google Analytics, the entire setup takes under 10 minutes with no code required. The manual method is optional and only relevant if you prefer not to use plugins.
How long does it take for Google Analytics to show data?
Real-time data appears within seconds. Standard reports in GA4 can take 24 to 48 hours to fully populate after the tracking code is first installed.
Can I use Google Analytics on WordPress.com?</a>.
WordPress.com’s free and lower-tier plans do not support Google Analytics integration directly. You need a self-hosted WordPress site (WordPress.org) or a WordPress.com Business plan or higher. If you are on free hosting and want full control, consider upgrading to a proper host like Hostinger
Will Google Analytics slow down my WordPress site?
GA4’s tracking script is lightweight and asynchronous, meaning it loads independently without blocking your page content. For maximum performance, you can use plugins like WP Rocket to defer the analytics script. See our list of best caching plugins for WordPress for options that support script deferral.
What is the difference between Google Analytics and Google Search Console?
Google Analytics tracks user behavior on your site – sessions, page views, events, and conversions. Google Search Console tracks how your site appears in Google search results – impressions, click-through rates, and keyword rankings. They are different tools that work best when connected together.
Conclusion
Adding Google Analytics to WordPress is one of the first things you should do after launching a site. Without it, you have no reliable way to know what is working, what is not, and where to focus your energy.
Here is a quick recap of what we covered:
- Create a GA4 property and get your Measurement ID
- Use Site Kit or a lightweight plugin to connect GA4 to WordPress (no coding needed)
- Verify tracking is working with the Real-time report
- Filter out your own traffic and link Search Console for richer data
The whole process takes less than 15 minutes. After that, you will have a clear picture of your audience growing in real time.
Ready to go further? Now that you have analytics in place, make sure your site is fast, secure, and optimized. Start with these guides:
- How to Speed Up Your WordPress Website
- The Complete WordPress Security Guide
- Essential WordPress Plugins Every New Website Needs
Got a question about setting up Google Analytics on your WordPress site? Drop it in the comments – happy to help.